With the latest generation of Copilot+ PCs, Microsoft is integrating AI deep into the core of Windows with features like Recall and Click to Do. In this post we’ll look at Click to Do and how you can use it to launch an Uno Platform application.
Before we jump into our Uno Platform application, let’s take a quick look at Click to Do. Firstly, this Windows feature is still in preview – this is very evident as I kept having to restart it whilst working with it (you can do this by launching the “Click to Do (preview)” application from the Start menu). You also currently need to be a) on a Copilot+ PC and b) on the latest dev preview of Windows (at time of writing).
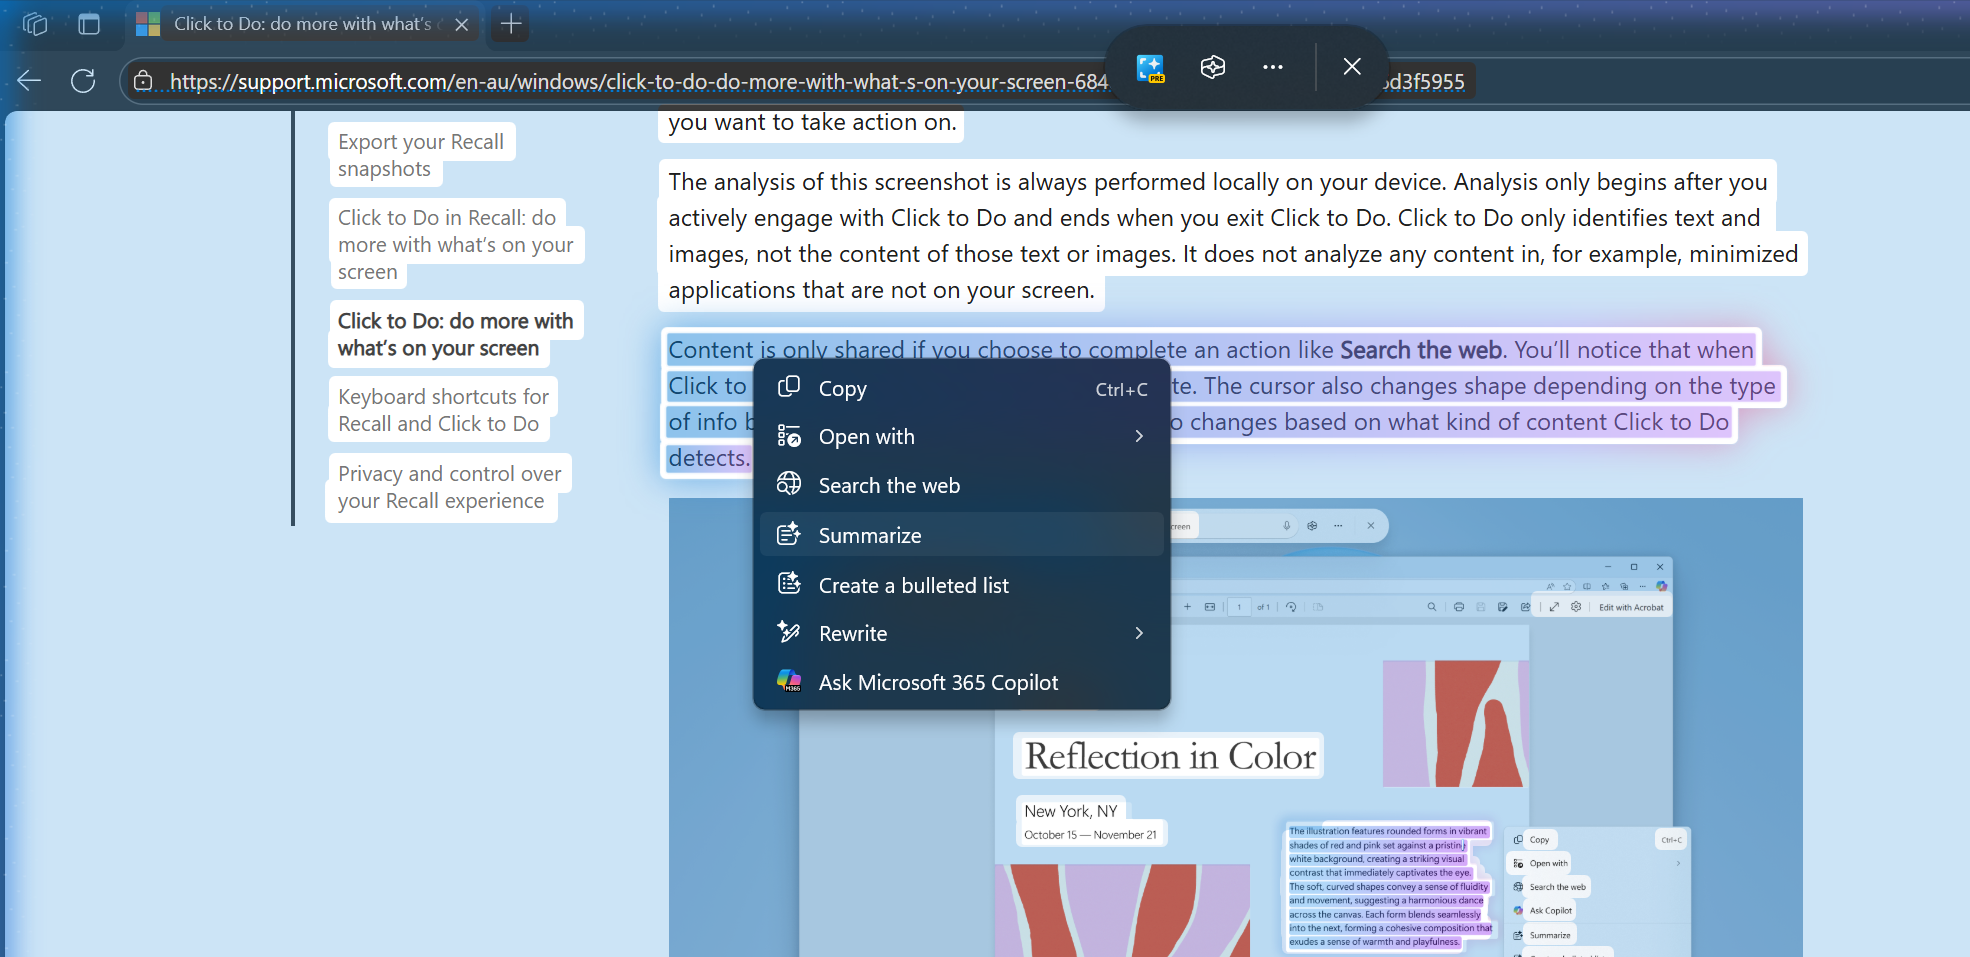
You can launch Click to Do by holding the Start key and either pressing Q on the keyboard, or clicking with the mouse. The latter I found easiest, particularly if you’re interested in a particular image or text on the screen. As you can see in the following image, when you trigger Click to Do, Windows attempts to highlight text on the screen (including embedded in images) and then provides you a context menu of actions you can perform with the selection.
To get started integrating your application with Click to Do, you should start with the developer documentation (overview, actions registration, package manifest) and understand the different types of action entities and how you can launch your application either via URI or via COM. In this post we’re going to keep it simple and register an Uno Platform application to be launched via URI.
One thing to note is that as Click to Do is a Windows features, you’ll need to make sure you include the Windows App SDK target when creating your Uno Platform application.
There are three things you need to do in order to integrate your Uno Platform application with Click to Do:
- Include action registration JSON file as Content in your application.
- Register for the
com.microsoft.windows.ai.actionsextension in the packageappx.manifest, as well as setting awindows.protocol, the URI protocol to use to launch the application. - Handle the launch arguments.
Let’s go through each of these.
Actions Registration
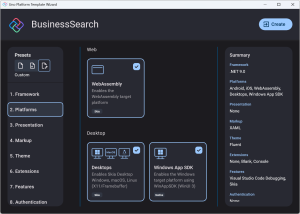
Add a new file into the Assets folder. We’ll call it actions.json but you can call it what you want, just make sure you use the same name later in the packagappx.manifest. In this file, include the registration for your actions, for example.
{
  "version": 1,
  "actions": [
    {
      "id": "BusinessSearch.UriActions.NameSearch",
      "description": "Name search",
      "inputs": [
        {
          "name": "Message",
          "kind": "Text"
        }
      ],
      "outputs": [],
      "instantiationDescription": "Business Name Search: '${Message.ShortText}'",
      "invocation": {
        "type": "Uri",
        "uri": "business-search://NameSearch?name=${Message.Text}"
      }
    }
  ]
}
The details for the JSON schema can found in the documentation but in brief, this JSON snippet registers a single action, BusinessSearch.UriActions.NameSearch, that accepts a single input, Message, that is Text. The application will be invoked using a Uri, and will used the defined uri template, which provides the Message.Text as the name query string value.
Package Manifest
Simply including a JSON file as Content isn’t enough, you need to update the packagappx.manifest file to register the com.microsoft.windows.ai.actions extension, specifying the name of the JSON file that includes the actions to register.
The following packageappx.manifest has been modified to include an additional namespace, uap3, and an Extensions block that registers the actions extension, specifying the Actions.json file, and registers the business-search protocol, which will be used to launch the application. Note that this protocol aligns with the uri template specified earlier in the Actions.json
<?xml version="1.0" encoding="utf-8"?>
<Package
  xmlns="http://schemas.microsoft.com/appx/manifest/foundation/windows10"
  xmlns:uap="http://schemas.microsoft.com/appx/manifest/uap/windows10"
  xmlns:uap3="http://schemas.microsoft.com/appx/manifest/uap/windows10/3"
  xmlns:rescap="http://schemas.microsoft.com/appx/manifest/foundation/windows10/restrictedcapabilities"
  IgnorableNamespaces="uap rescap">

    <Identity />
    <Properties />

    <Dependencies>
        <TargetDeviceFamily Name="Windows.Universal" MinVersion="10.0.17763.0" MaxVersionTested="10.0.19041.0" />
        <TargetDeviceFamily Name="Windows.Desktop" MinVersion="10.0.17763.0" MaxVersionTested="10.0.19041.0" />
    </Dependencies>

    <Resources>
        <Resource Language="x-generate"/>
    </Resources>

    <Applications>
        <Application Id="App"
          Executable="$targetnametoken$.exe"
          EntryPoint="$targetentrypoint$">
            <uap:VisualElements />
            <Extensions>
                <uap3:Extension Category="windows.appExtension">
                    <uap3:AppExtension
                    Name="com.microsoft.windows.ai.actions"
                    Id="BusinessSearchActions"
                    DisplayName="Actions for Business Search"
                    PublicFolder="Assets">
                        <uap3:Properties>
                            <Registration>Actions.json</Registration>
                        </uap3:Properties>
                    </uap3:AppExtension>
                </uap3:Extension>
                <uap:Extension Category="windows.protocol">
                    <uap:Protocol Name="business-search"/>
                </uap:Extension>
            </Extensions>
        </Application>
    </Applications>

    <Capabilities>
        <rescap:Capability Name="runFullTrust" />
    </Capabilities>
</Package>
Application Logic
In the startup logic for the application the launch arguments need to be extracted and used by the application. For the purpose of this post we’re just going to extract the query string value and pass it through to the MainPage of the application.
    protected override void OnLaunched(Microsoft.UI.Xaml.LaunchActivatedEventArgs args)
    {
        var message = "";

#if WINDOWS
        var activationArgs = Microsoft.Windows.AppLifecycle.AppInstance.GetCurrent().GetActivatedEventArgs();
        if (activationArgs.Kind == ExtendedActivationKind.Protocol)
        {
            var protocolArgs = activationArgs.Data as ProtocolActivatedEventArgs;
            if (protocolArgs != null)
            {
                var query = protocolArgs.Uri.Query;
                message = query.Substring("?name=".Length);
            }
        }
#endif

        MainWindow = new Window();
#if DEBUG
        MainWindow.UseStudio();
#endif


        // Do not repeat app initialization when the Window already has content,
        // just ensure that the window is active
        if (MainWindow.Content is not Frame rootFrame)
        {
            // Create a Frame to act as the navigation context and navigate to the first page
            rootFrame = new Frame();

            // Place the frame in the current Window
            MainWindow.Content = rootFrame;

            rootFrame.NavigationFailed += OnNavigationFailed;
        }

        if (rootFrame.Content == null)
        {
            // When the navigation stack isn't restored navigate to the first page,
            // configuring the new page by passing required information as a navigation
            // parameter
            rootFrame.Navigate(typeof(MainPage), message);
        }

        MainWindow.SetWindowIcon();
        // Ensure the current window is active
        MainWindow.Activate();
    }
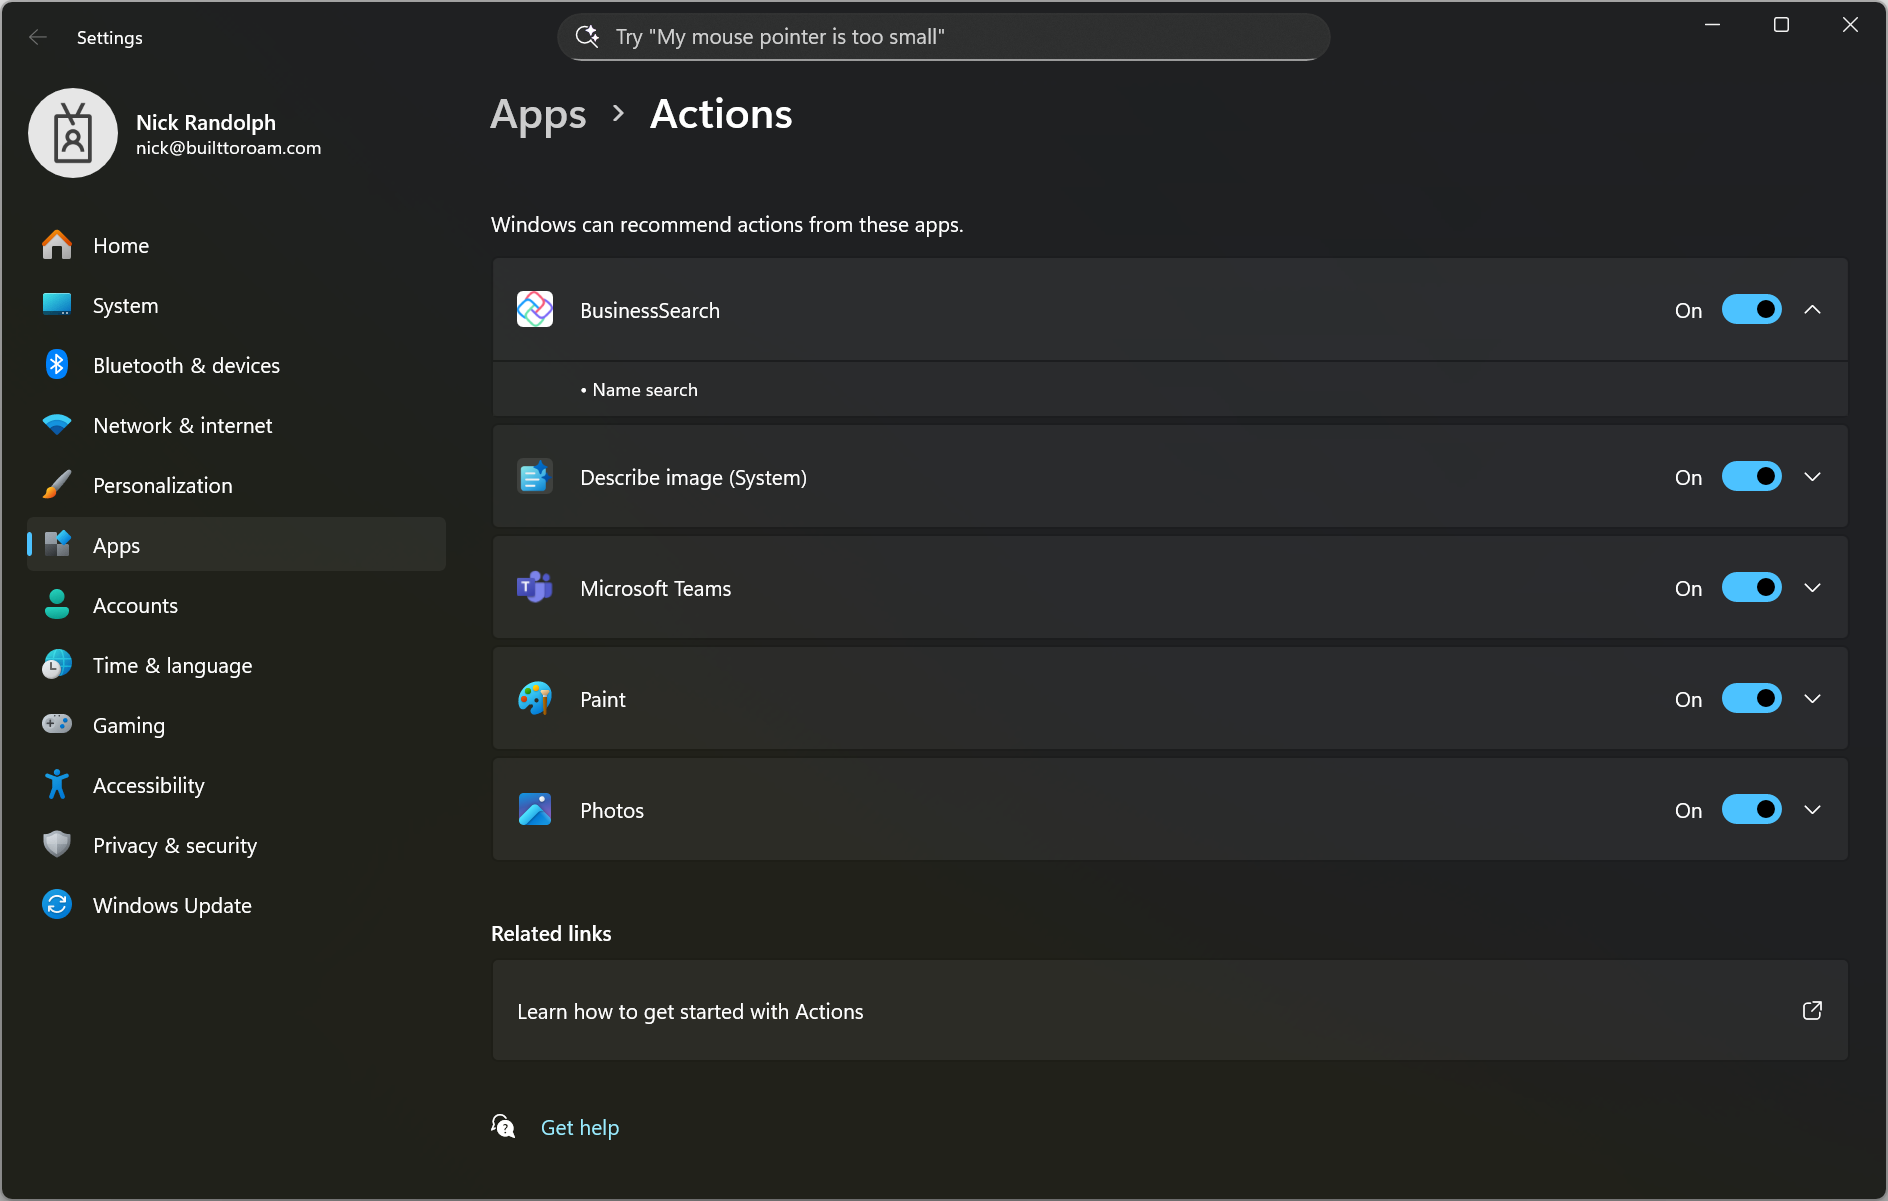
And now all we need to do is run the application for the first time in order for the actions to be registered. After running the application, you can check to confirm the actions have been registered by pressing Start and typing App Actions – there’s a new section under Settings that will appear in the Start menu. The Apps > Actions section of Settings allows you to see all registered actions, and opt in/out of them.
With our Uno Platform application successfully registered, let’s trigger Click to Do and use it to launch the application. Here we’ve triggered Click to Do using Start + Q (Start + mouse click will work too) and have selected a block of text. At the bottom of the Click to Do context menu is our newly registered action, Business Search”

Clicking the Business Search will launch the Uno Platform application, displaying the text as it’s defined in the query string value.
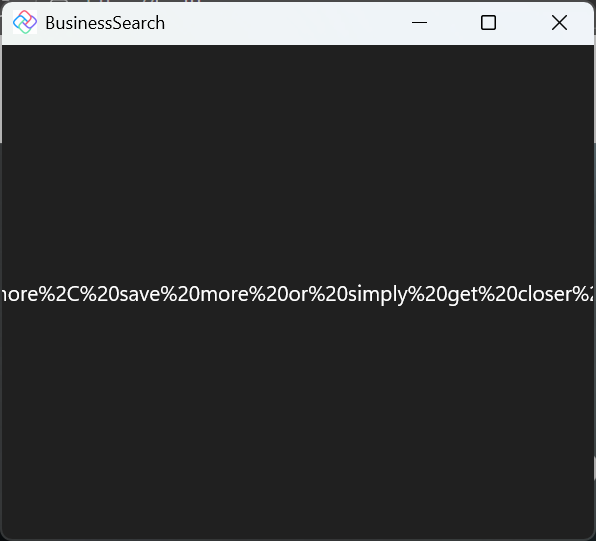
Obviously, our application should do more to process and use the provided Message.Text value.
In this post we’ve connected an Uno Platform application to Click to Do so that it’s launched via URI in order to take action on a specified piece of text. This is just one way you can include AI into your Uno Platform application.